목차
[실습] Flappy Bird 2D_02
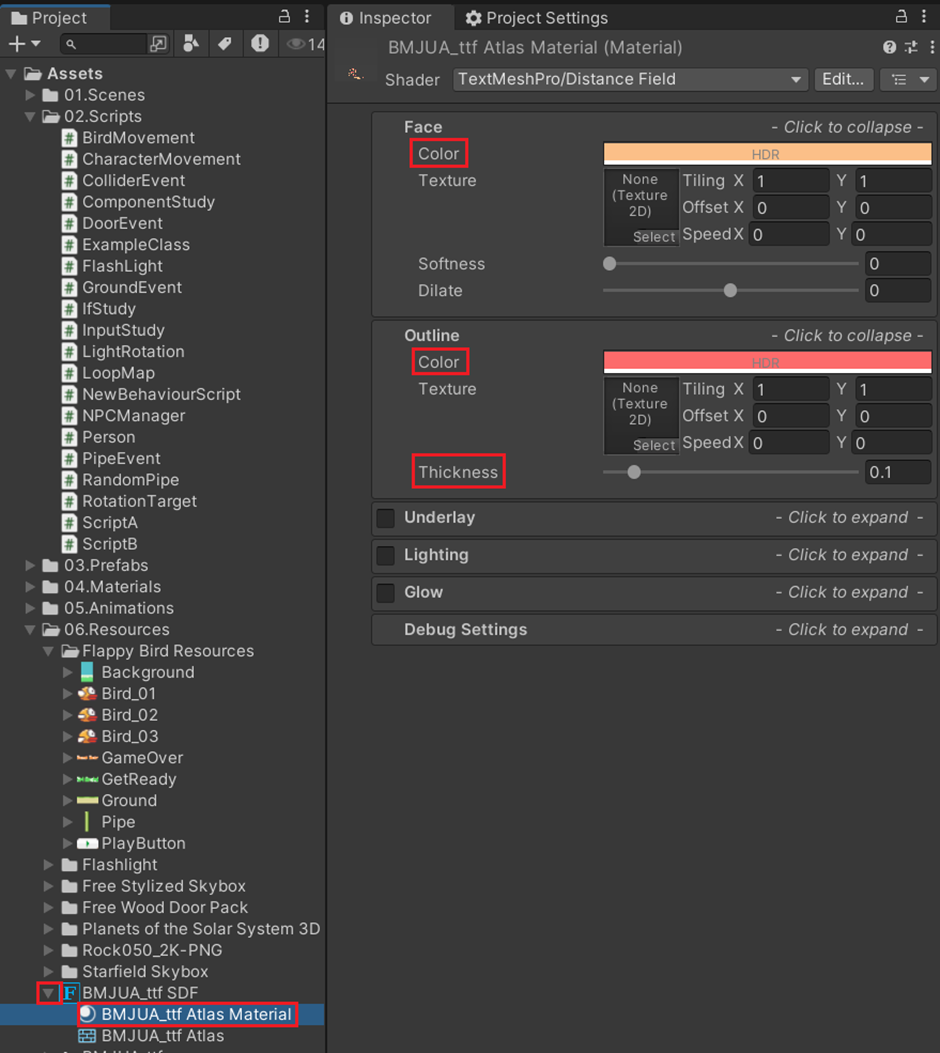
Title 꾸미기
: 폰트의 Material 수정하기
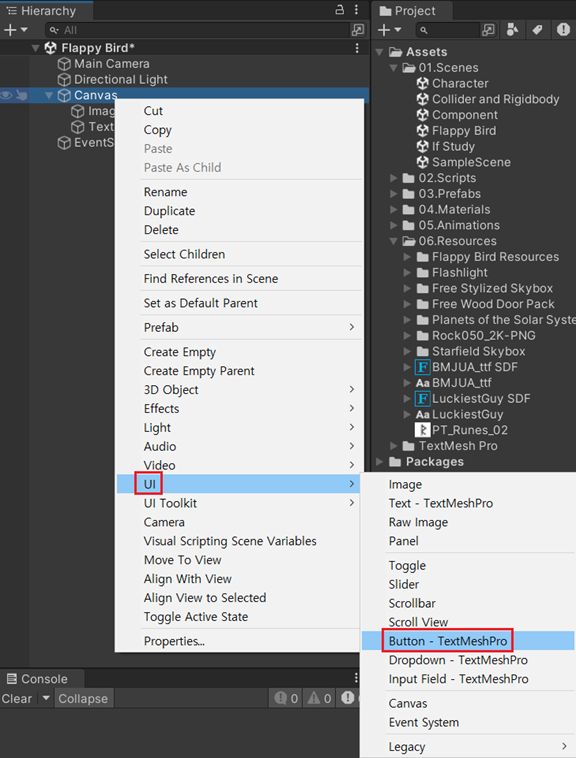
Button
: Image + Button + Text
>> 만드는 법
>> 버튼 크기 조절
: Scale 말고 Width와 Height로 하기
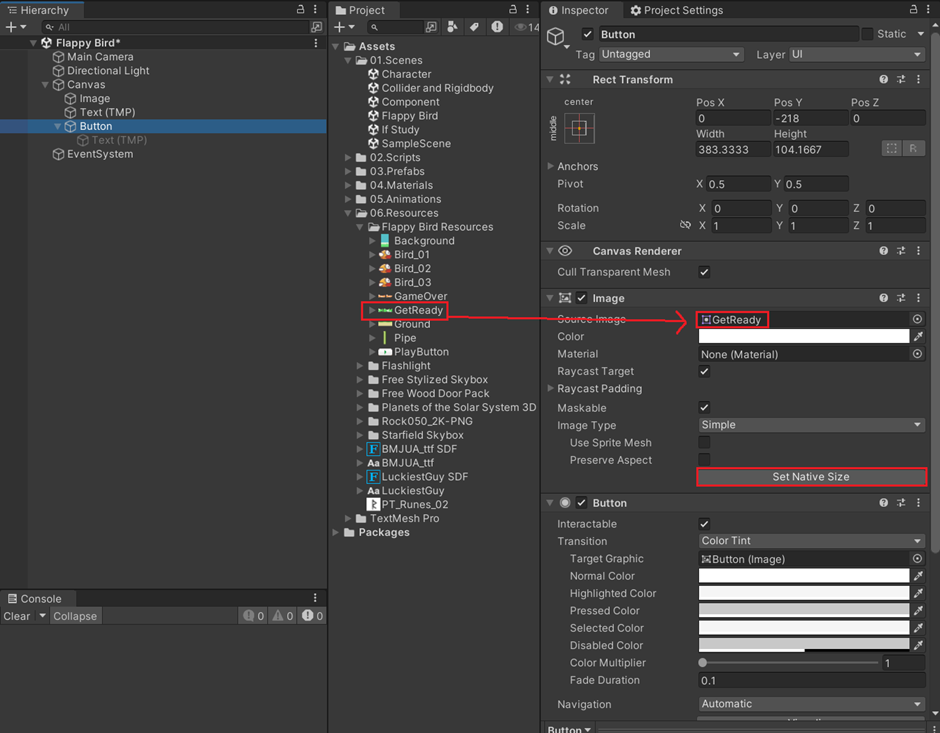
>> 버튼에 이미지 넣고 해상도 맞추기
Set Native Size : Image 해상도 맞추기
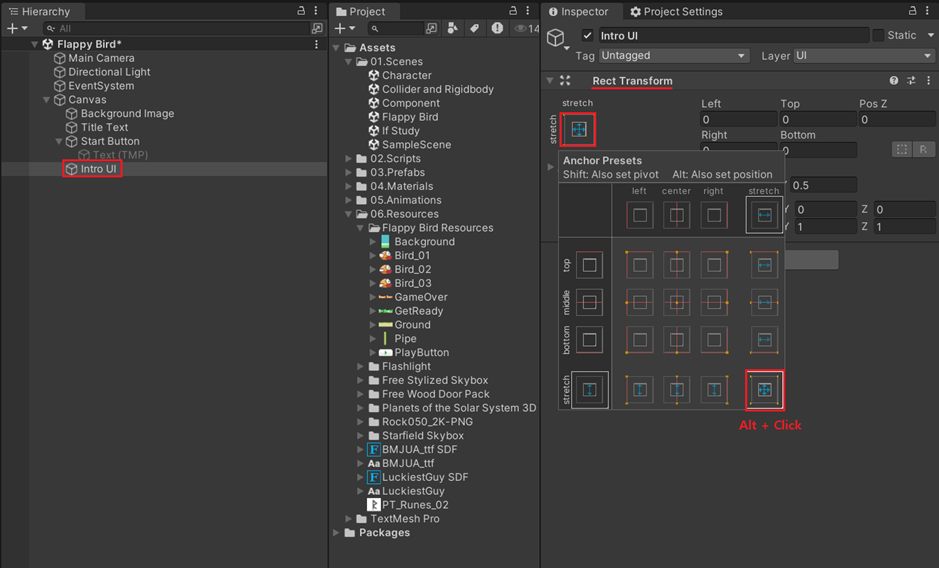
만든 Intro를 하나로 그룹화 하기
: Intro UI 안에 자식으로 Image, Title, Button 넣기 --> UI는 Hierarchy에 있는 순서가 중요
>> Start를 눌렀을 때 한꺼번에 Off하기 위해
※ 그룹화 및 Anchor, Position 설정
※ UI를 그리는 Object인 Canvas에 Create Empty하면 자동으로 UI용 GameObject가 만들어짐 --> Transform이 Rect Transform으로 생긴 모습 / Button도 마찬가지
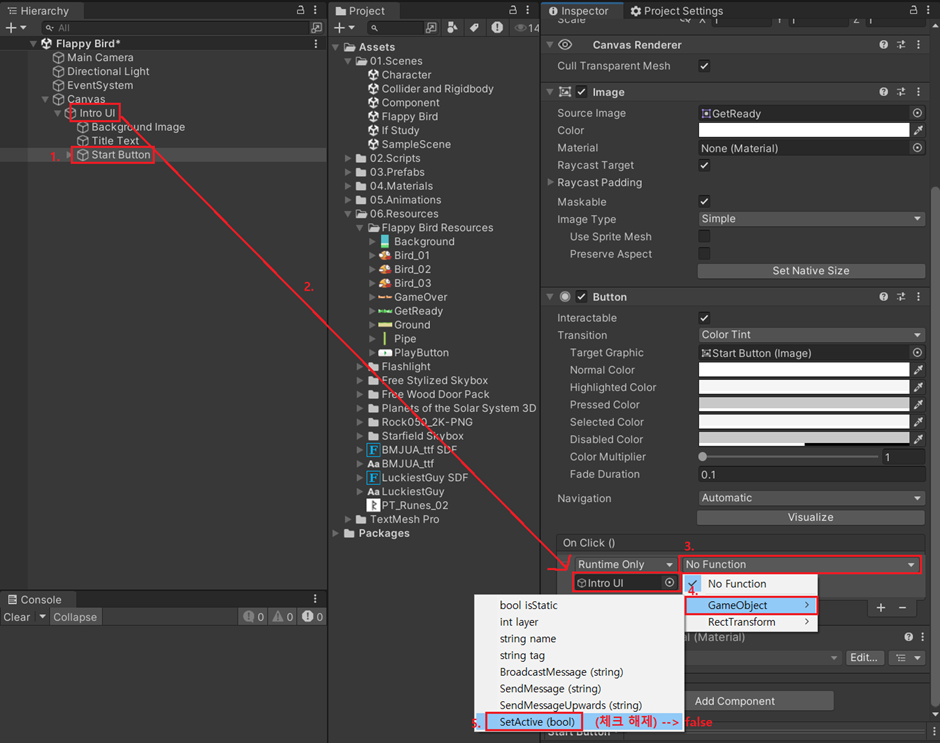
OnClick()
: Button을 눌렀을 때의 기능
>> IntroUI 끄게 만들기
Main
Background 추가 및 배경 무한 루프 만들기
1. Project에서 Hierarchy로 Background 파일 드래그하여 추가
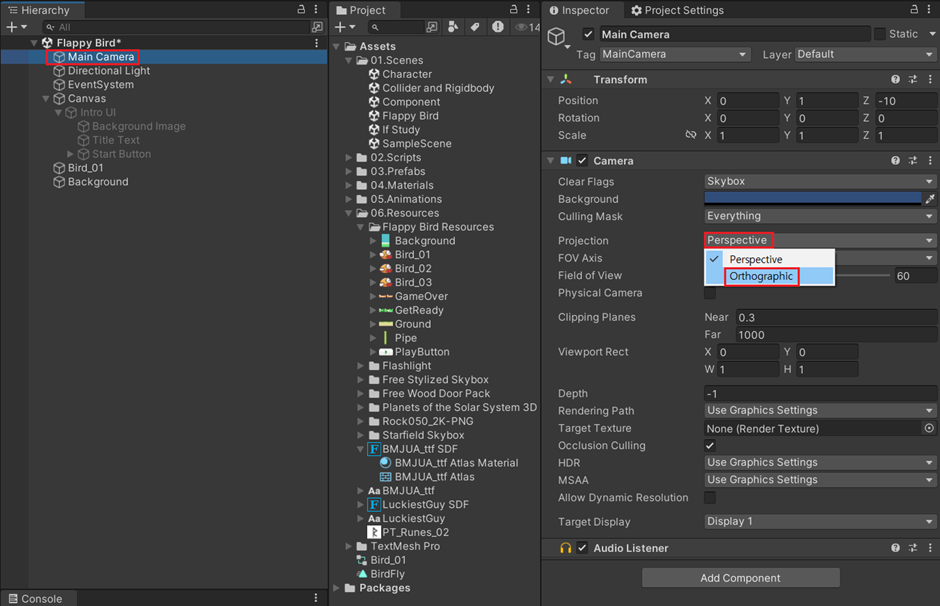
2. Camera 설정 --> 거리감 없애기
3. Background를 총 4장 만들어서 X Position 변경
>> 각각 -8, -2, 4, 10
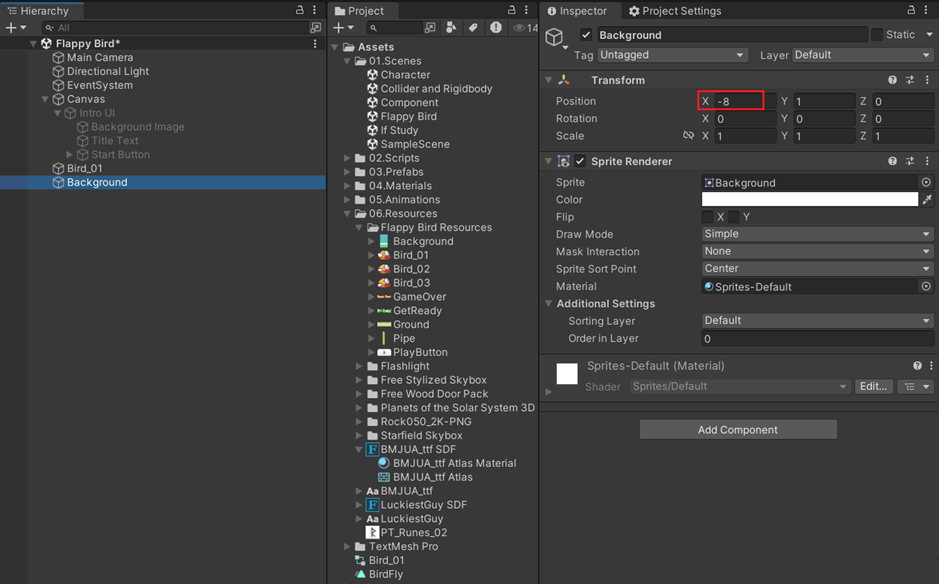
※ Sprite는 Hierarchy에 있는 순서가 중요하지 않음
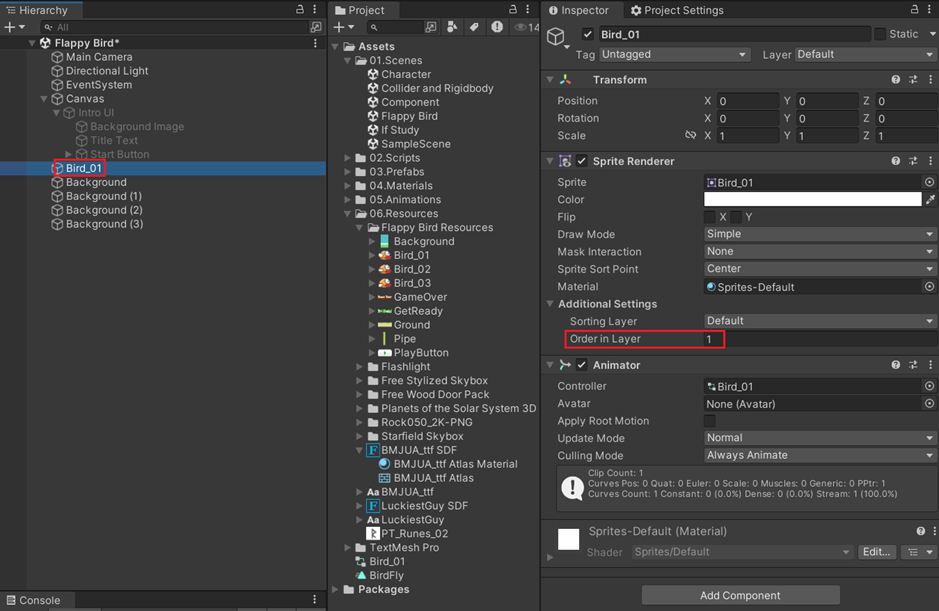
※ Order in Layer : 그리는 순서 --> 0부터 순서대로 그림, 따라서 Bird를 1로 설정하면 Bird를 나중에 그리기 때문에 배경 앞에 나타남
4. Script 작성
using System.Collections;
using System.Collections.Generic;
using UnityEngine;

public class LoopMap : MonoBehaviour
{
    private SpriteRenderer sp;
    public float offsetSpeed = 0.5f; // Map이 움직이는 속도

    void Start()
    {
        sp = GetComponent<SpriteRenderer>();
        // sp가 private라 Inspector에서 넣어줄 수 없기 때문에 선언
    }

    void Update()
    {
        float offsetVal = offsetSpeed * Time.deltaTime;
        sp.material.SetTextureOffset("_MainTex", sp.material.mainTextureOffset + new Vector2(offsetVal, 0f));
        // material에 있는 shader에 접근해서 offset을 변경
    }
}
※ offset : Image의 기준점
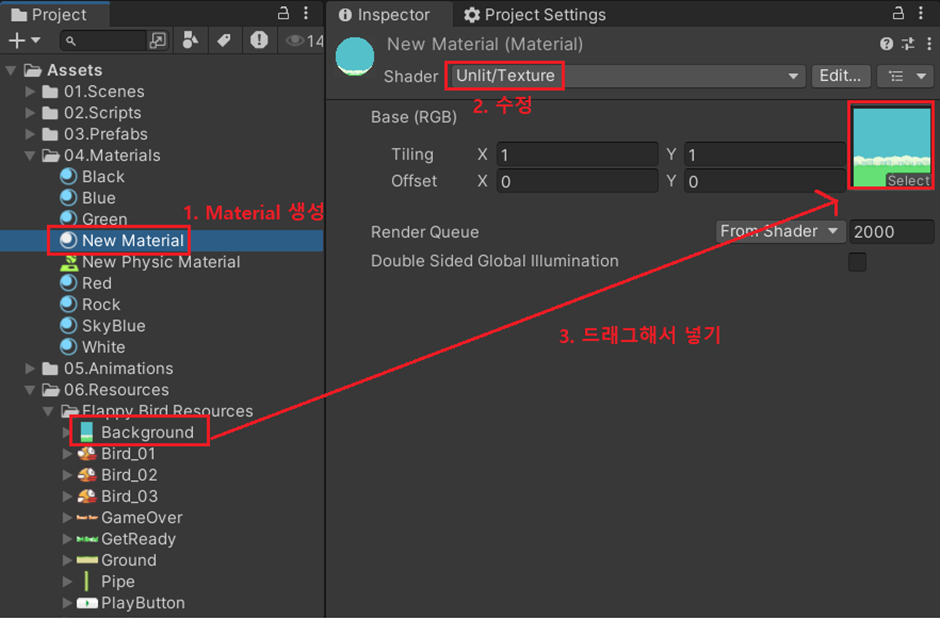
5. Material 수정
: 기존 background에 있는 material은 수정이 불가능하기 때문에, 새로 material 생성
>> 3D가 아니기 때문에, shader를 Unlit – Texture로 수정 후, 오른쪽 빈 칸에 background image 추가
6. 배치한 Background에 만든 material 적용 및 Script 추가

Bird 구현
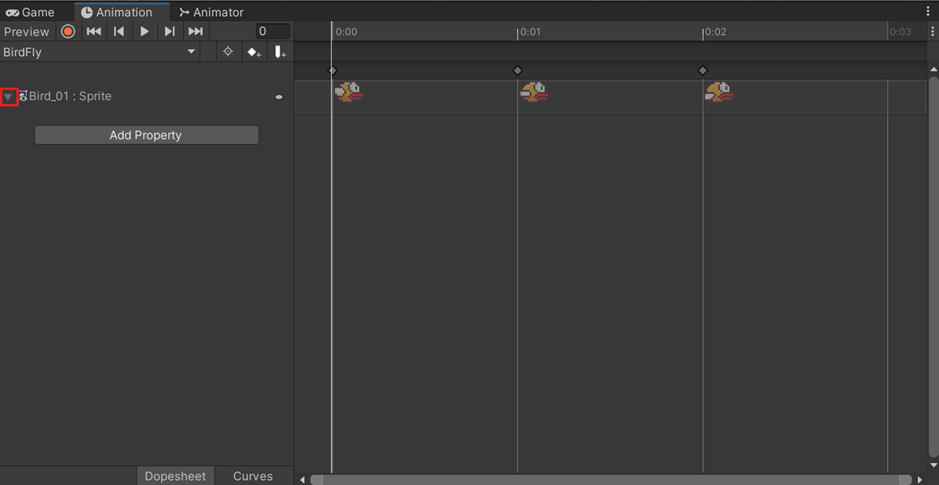
1. Character Animation 추가
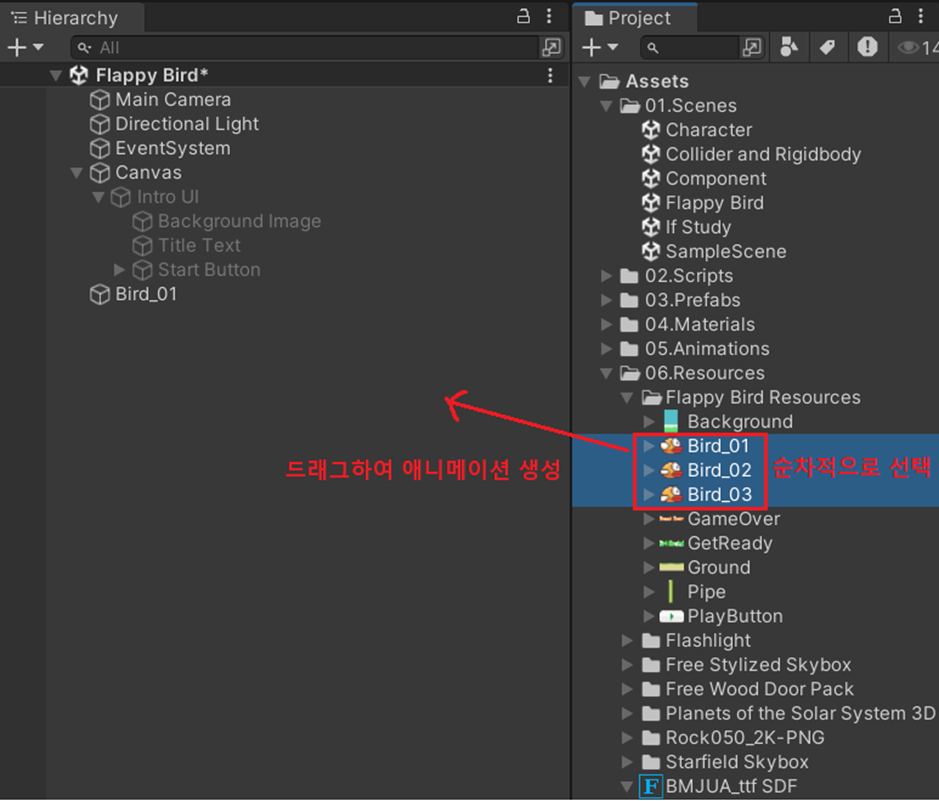
>> Animation 창으로 가서 보면 상세하게 볼 수 있음
2. Bird에 Rigidbody 2D 넣기
3. Script 작성 --> Space Bar를 눌렀을 때, 위로 날아오르는 기능
using System.Collections;
using System.Collections.Generic;
using UnityEngine;

public class BirdMovement : MonoBehaviour
{
    private Rigidbody2D myRigid;
    public float flyPower = 10f;

    void Start()
    {
        myRigid = GetComponent<Rigidbody2D>();
    }

    void Update()
    {
        if (Input.GetKeyDown(KeyCode.Space))
        {
            myRigid.AddForce(Vector2.up * flyPower, ForceMode2D.Impulse); // 위쪽으로 힘을 가함
        }
    }
}
4. Bird에 Script 추가
5. Space를 연속으로 누르면 가하는 힘이 중첩되어 높게 튀어오르는 문제 해결
using System.Collections;
using System.Collections.Generic;
using UnityEngine;

public class BirdMovement : MonoBehaviour
{
    private Rigidbody2D myRigid;
    public float flyPower = 10f;

    public float limitSpeed = 5f;

    void Start()
    {
        myRigid = GetComponent<Rigidbody2D>();
    }

    void Update()
    {
        if (Input.GetKeyDown(KeyCode.Space))
        {
            myRigid.AddForce(Vector2.up * flyPower, ForceMode2D.Impulse); // 위쪽으로 힘을 가함

            // 속도 체크
            if (myRigid.velocity.y > limitSpeed) // 새의 y축 속도가 제한 속도보다 큰가?
            {
                // 속도 재조정
                myRigid.velocity = new Vector2(myRigid.velocity.x, limitSpeed);
            }
        }
    }
}
Pipe 제작
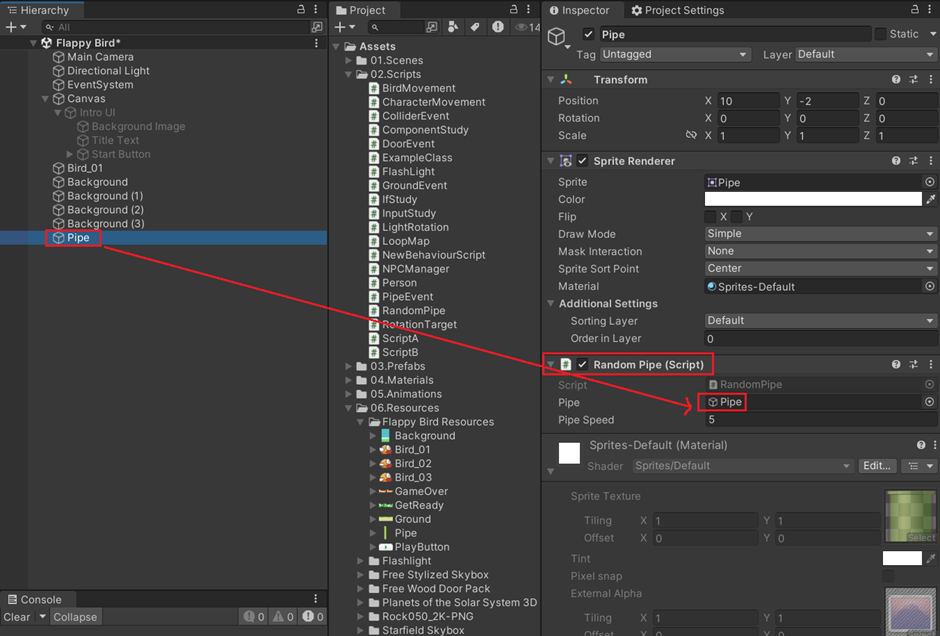
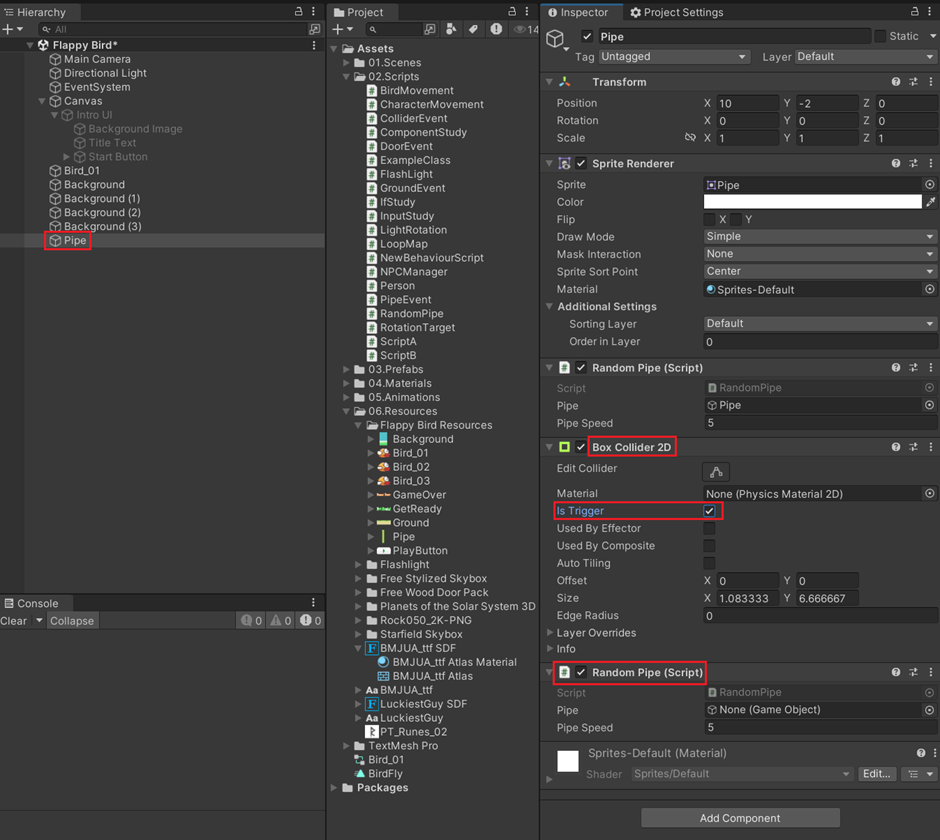
1. Project에서 Pipe Hierarchy에 끌어오기 --> Position 수정 (X : 10, Y : -2)
2. Pipe 이동시키는 Script 작성
using System.Collections;
using System.Collections.Generic;
using UnityEngine;

public class RandomPipe : MonoBehaviour
{
    public GameObject pipe;
    public float pipeSpeed = 5f;

    void Update()
    {
        pipe.transform.position -= pipeSpeed * Time.deltaTime * Vector3.right;
    }
}
3. Pipe Object에 Script 넣고 Pipe 할당
4. Pipe의 충돌/감지를 위해 Script 작성
using System.Collections;
using System.Collections.Generic;
using UnityEngine;

public class PipeEvent : MonoBehaviour
{
    public void OnTriggerEnter2D(Collider2D collision)
    {
        if (collision.CompareTag("Player"))
        {
            Debug.Log("Game Over");
        }
    }
}
>> 이후 Bird에 "Player" Tag 추가
※ 코드가 작동하려면 양쪽 다 Collider가 있어야 하고 최소 한 쪽은 Rigidbody가 있어야 함
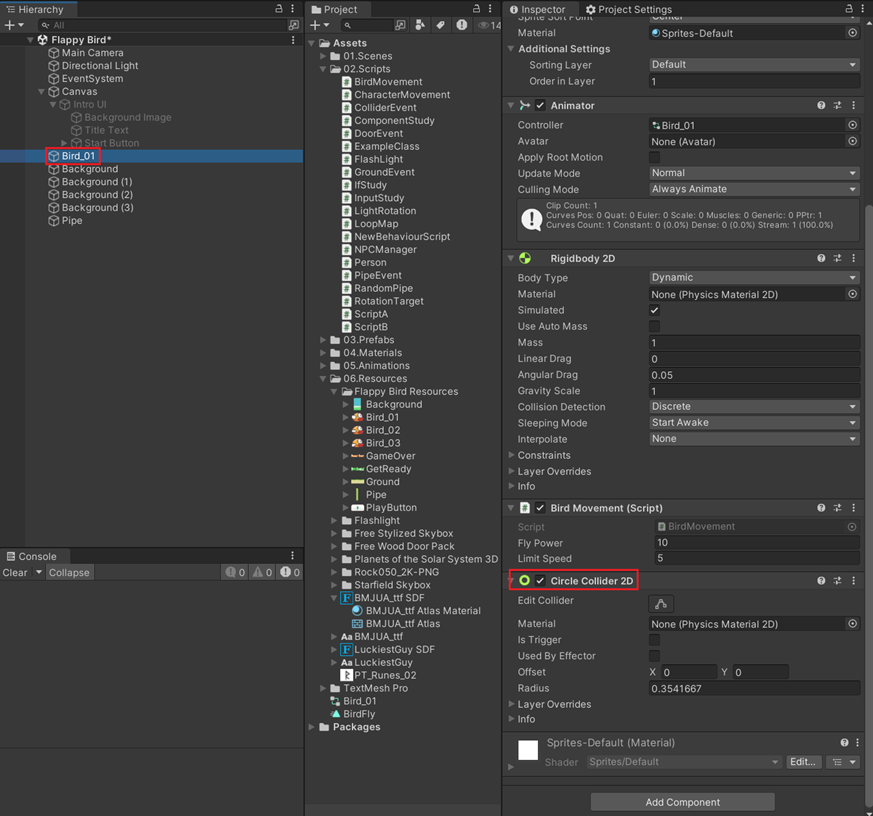
5. Bird에 Circle Collider 2D 추가
Circle Collider : 2D에서 가장 최적화된 Collider
※ 3D에서는 Box Collider가 가장 최적화됨
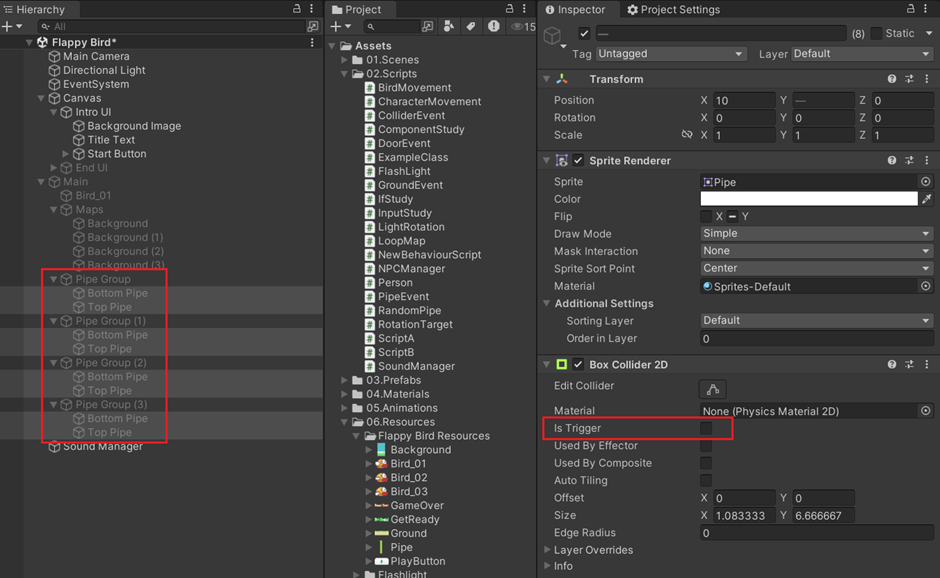
6. Pipe에 Box Collider 2D 추가 및 Is Trigger 체크 그리고 Script 추가
End UI 제작
1. 빈 UI Object 만들기 --> Canvas 우클릭 – Create Empty --> Anchor 및 Position 수정
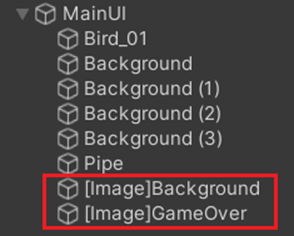
2. Image 2개 생성
>> 순서 매우 중요
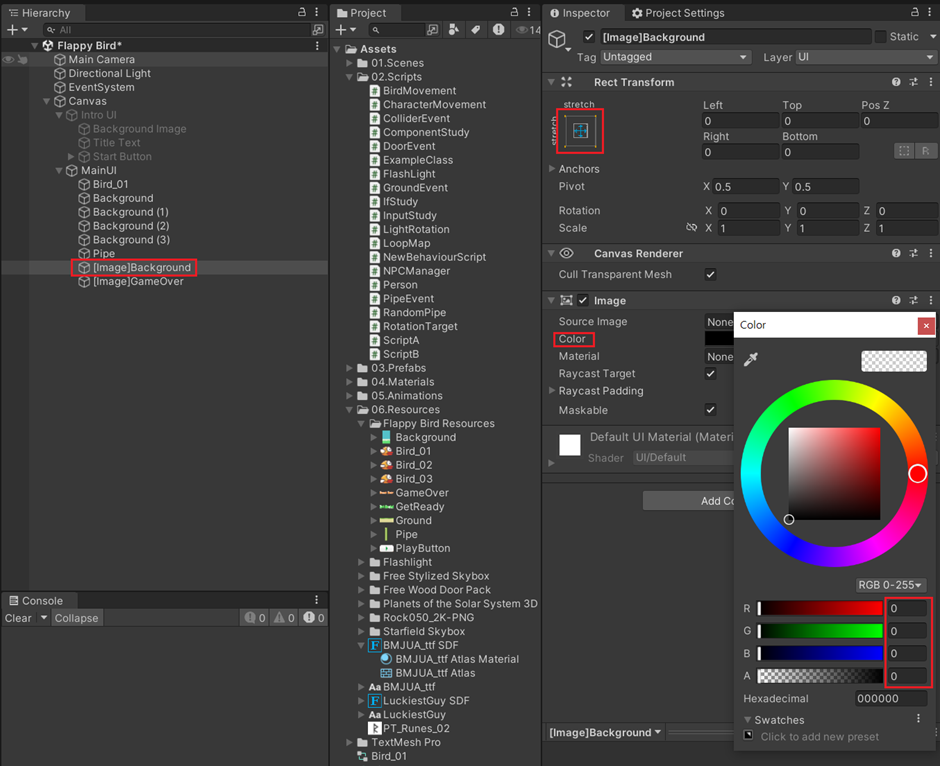
3. [Image]Background의 Anchor 및 Position 수정하고, Color에서 Alpha값 0으로 수정 및 검은색으로 변경
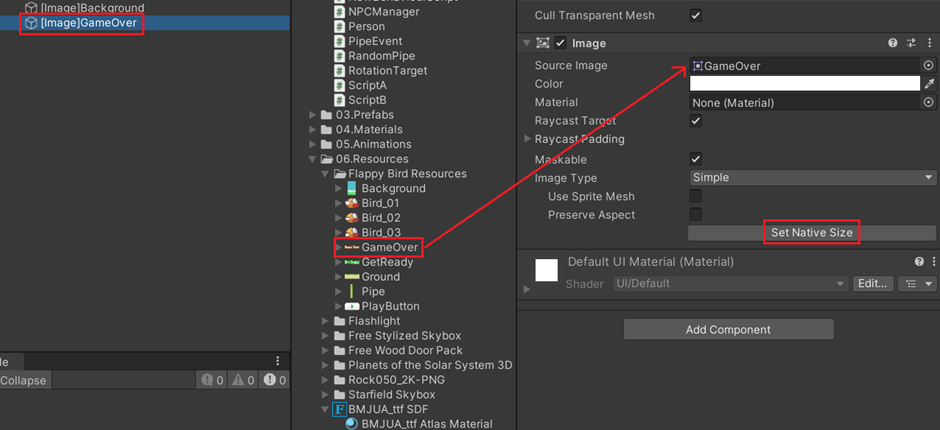
4. [Image]GameOver에 GameOver Image 삽입 후 Set Native Size
5. End UI를 선택하여 애니메이션 생성

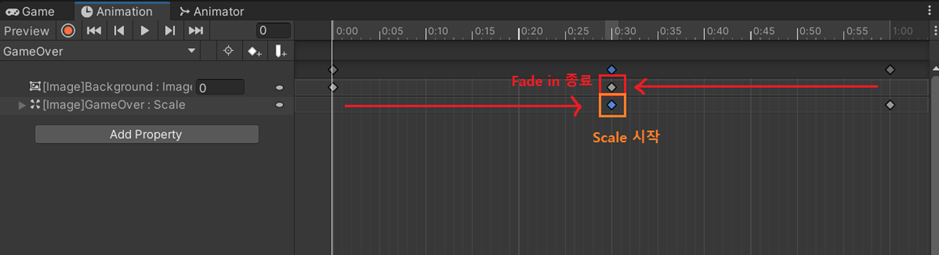
6. 녹화 버튼 누르고 1:00 선택 후, [Image]Background 선택하여 Color의 Alpha 값 255로 수정한 뒤 녹화 종료

7. 다시 녹화 버튼 누르고 GameOver를 선택하고 0:00으로 옮긴 뒤, Scale을 0, 0, 0으로 수정, 다음으로 1:00으로 옮긴 뒤, Scale을 2, 2, 2로 변경한 뒤 녹화 종료
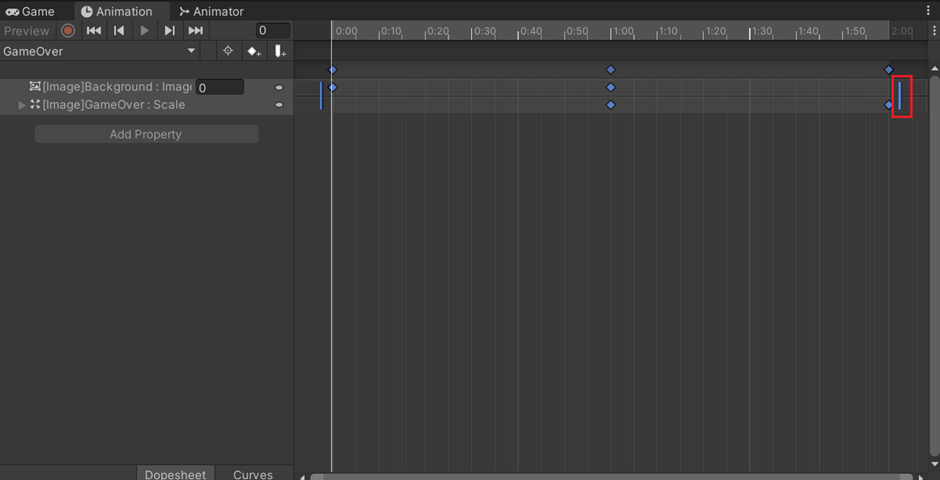
8. Fade in이 먼저 되고 글씨가 나오게 하기 --> dope 옮기기
※ 너무 빠르면 전체 선택한 뒤 늘려주기
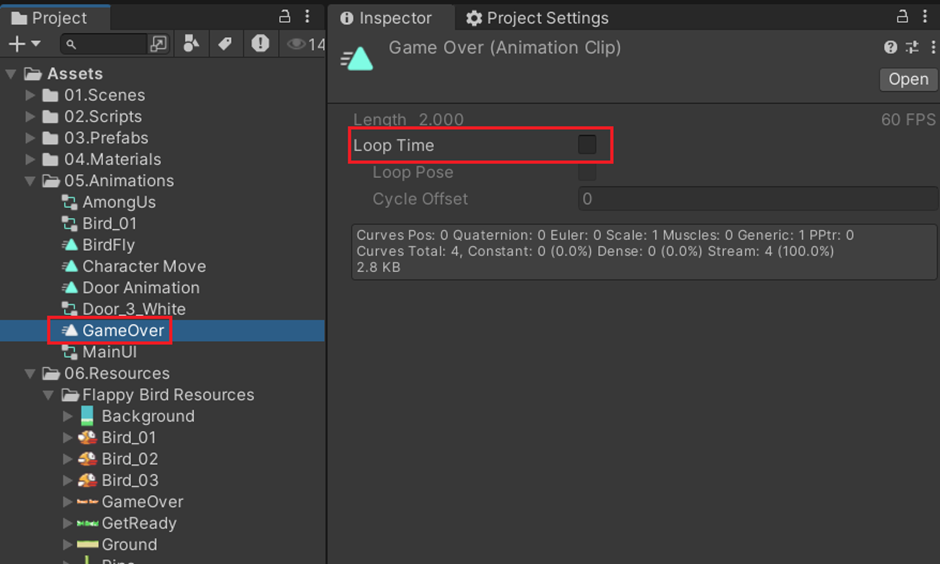
9. Project의 Animation으로 가서 GameOver의 Loop 끄기
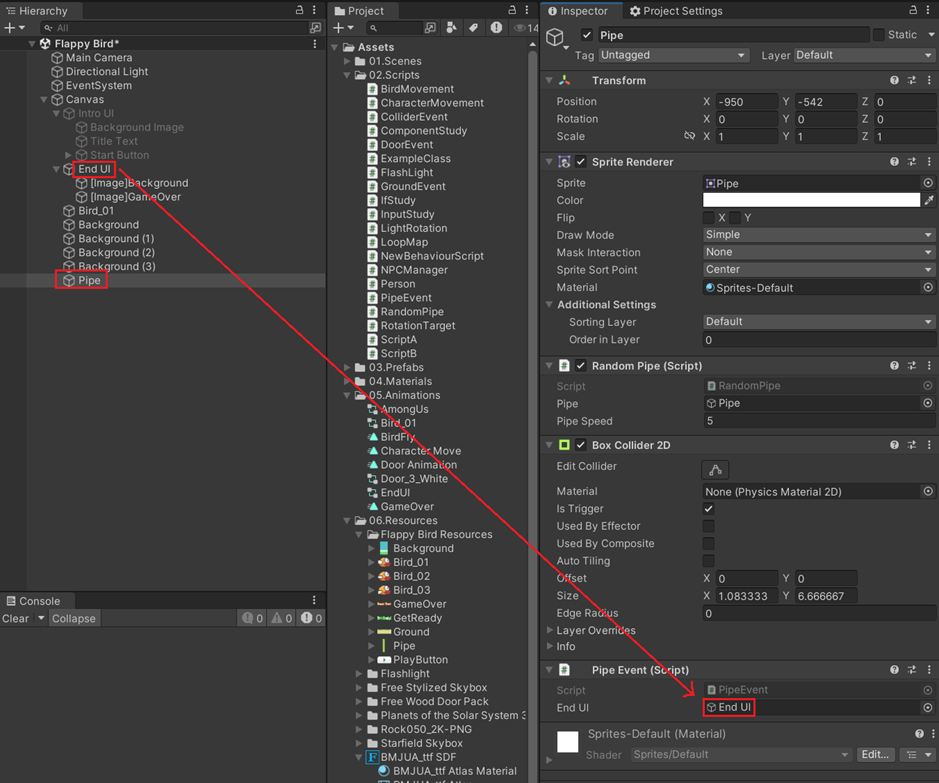
10. Pipe에 부딪혔을 때 End UI 실행되게 하기
: Script 수정 후 End UI 할당 (End UI Active 끄기)
using System.Collections;
using System.Collections.Generic;
using UnityEngine;

public class PipeEvent : MonoBehaviour
{
    public GameObject endUI;
    public void OnTriggerEnter2D(Collider2D collision)
    {
        if (collision.CompareTag("Player"))
        {
            endUI.SetActive(true); // End UI가 켜지는 기능
            Debug.Log("Game Over");
        }
    }
}
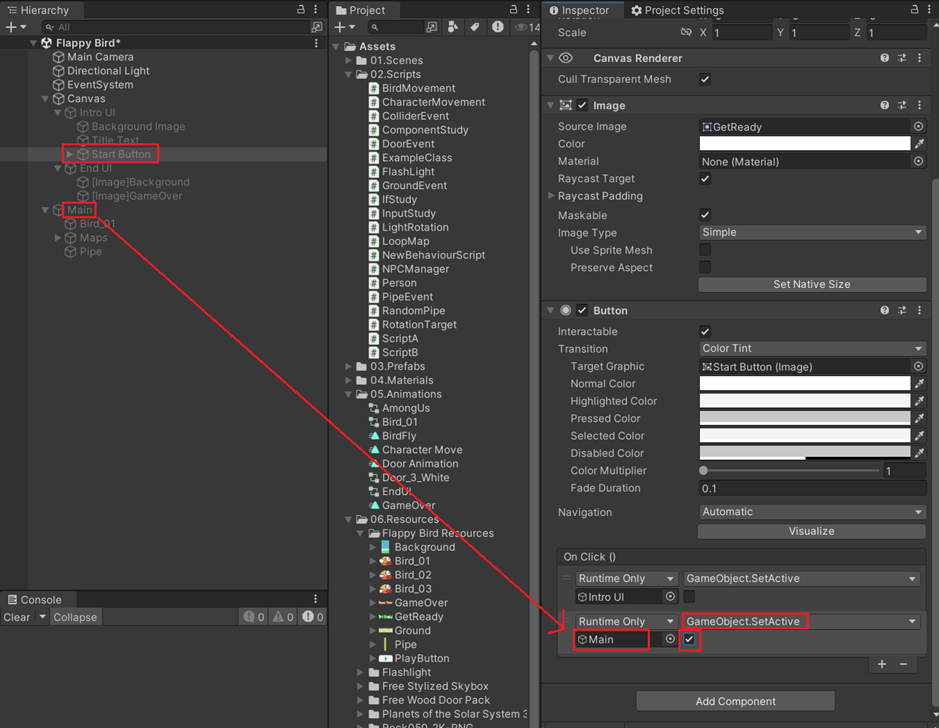
Main 세팅
1. 우선 Main Active 끄고 Intro Active 켜기
2. Intro에서 GameStart를 눌러야 Main이 실행되도록 Intro에 있는 Button에서 OnClick()에 하나 더 추가하고 Main 넣고 GameObject -SetActive 체크하기
Pipe를 랜덤으로 생성하기 위해 Code 배우기
배열과 List
- 배열 : 개수가 바뀌지 않을 때 사용
- List : 개수가 바뀔 때 사용
Indexer
: 순서로 접근할 수 있는 방법 --> 0부터 시작
Pipe 구현
1. Pipe가 하나 밖에 없어서 이전처럼 만든 것, 다시 'Pipe'의 Inpector에서 'Random Pipe' Script 삭제
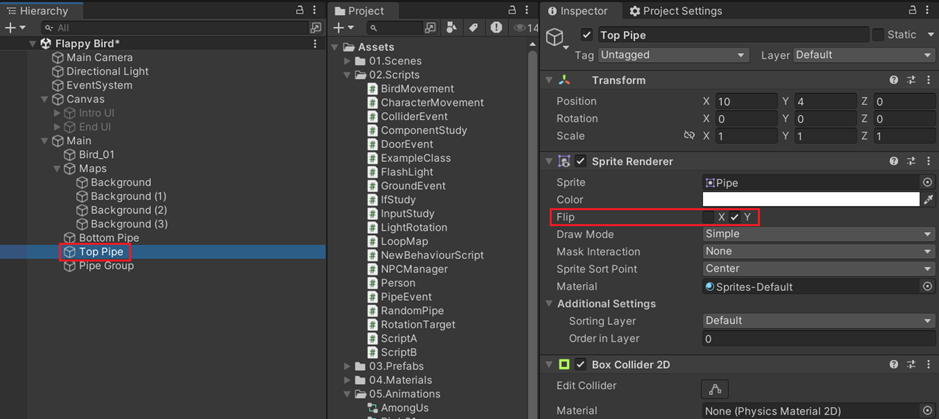
2. Pipe 복사해서 위에도 배치
: Y Position 수정
>> Flip 기능 활용해서 뒤집기
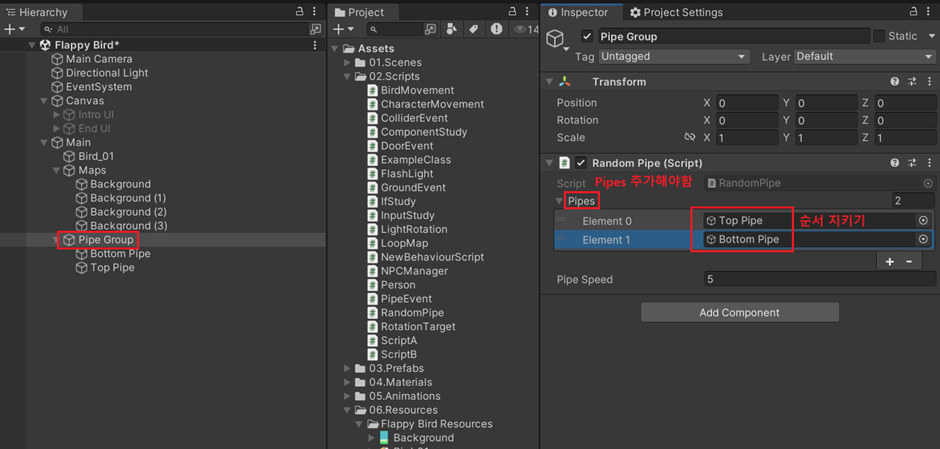
3. Pipe 두개를 중간으로 배치 후, Main을 우클릭하여 Create Empty, Group을 만들어 묶고 거기에 'RandomPipe' Script 추가
4. RandomPipe Script 수정
>> GameObject를 배열로 변경
using System.Collections;
using System.Collections.Generic;
using UnityEngine;

public class RandomPipe : MonoBehaviour
{
    public GameObject[] pipes; //GameObject 배열
    public float pipeSpeed = 5f;

    void Update()
    {
        pipes[0].transform.position -= pipeSpeed * Time.deltaTime * Vector3.right;
        pipes[1].transform.position -= pipeSpeed * Time.deltaTime * Vector3.right;
    }
}
5. Pipe Group의 Inspector에서 Pipe 할당
6. Script에 Enum 추가 (PIPE_TYPE)
using System.Collections;
using System.Collections.Generic;
using UnityEngine;

public class RandomPipe : MonoBehaviour
{
    public enum PIPE_TYPE { TOP, BOTTOM, ALL } // pipe가 랜덤하게 켜질 때, 경우의 수
    public PIPE_TYPE pipeType;

    public GameObject[] pipes; //GameObject 배열
    public float pipeSpeed = 5f;

    void Start()
    {
        // 처음 시작할 때, Pipe Type 설정
        switch (pipeType) // 수업에선 if, else if로 작성
        {
            case PIPE_TYPE.TOP:
                pipes[0].SetActive(true);
                pipes[1].SetActive(false);
                break;
            case PIPE_TYPE.BOTTOM:
                pipes[0].SetActive(false);
                pipes[1].SetActive(true);
                break;
            case PIPE_TYPE.ALL:
                pipes[0].SetActive(true);
                pipes[1].SetActive(true);
                break;
        }
    }

    void Update()
    {
        pipes[0].transform.position -= pipeSpeed * Time.deltaTime * Vector3.right;
        pipes[1].transform.position -= pipeSpeed * Time.deltaTime * Vector3.right;
    }
}
7. Pipe Group을 총 4개까지 복사
: X Position을 0, 5, 10, 15 으로 설정
8. Script에 Random 추가하여 pipeType 랜덤 설정
- Random.Range(0, 10) --> int형, 0 <= x < 10
- Random.Range(0, 10f) --> float형, 0 <= x <= 10f / 소수점 포함 7자리수까지 나옴
using System.Collections;
using System.Collections.Generic;
using UnityEngine;

public class RandomPipe : MonoBehaviour
{
    public enum PIPE_TYPE { TOP, BOTTOM, ALL } // pipe가 랜덤하게 켜질 때, 경우의 수
    public PIPE_TYPE pipeType;

    public GameObject[] pipes; //GameObject 배열
    public float pipeSpeed = 5f;

    void Start()
    {
        // 처음 시작할 때, Pipe Type 설정
        int ranInt = Random.Range(0, 3); // 0, 1, 2 중 랜덤하게 설정
        pipeType = (PIPE_TYPE)ranInt; // 형변환하여 pipeType 설정

        switch (pipeType) // 수업에선 if, else if로 작성
        {
            case PIPE_TYPE.TOP:
                pipes[0].SetActive(true);
                pipes[1].SetActive(false);
                break;
            case PIPE_TYPE.BOTTOM:
                pipes[0].SetActive(false);
                pipes[1].SetActive(true);
                break;
            case PIPE_TYPE.ALL:
                pipes[0].SetActive(true);
                pipes[1].SetActive(true);
                break;
        }
    }

    void Update()
    {
        pipes[0].transform.position -= pipeSpeed * Time.deltaTime * Vector3.right;
        pipes[1].transform.position -= pipeSpeed * Time.deltaTime * Vector3.right;
    }
}
9. Script로 pipe 재활용 설정 + 반복문 사용
using System.Collections;
using System.Collections.Generic;
using UnityEngine;
public class RandomPipe : MonoBehaviour
{
public enum PIPE_TYPE { TOP, BOTTOM, ALL } // pipe가 랜덤하게 켜질 때, 경우의 수
public PIPE_TYPE pipeType;
public GameObject[] pipes; //GameObject 배열
public float pipeSpeed = 5f;
void Start()
{
RandomPipeType();
}
void Update()
{
foreach (GameObject pipe in pipes)
{
pipe.transform.position -= pipeSpeed * Time.deltaTime * Vector3.right;
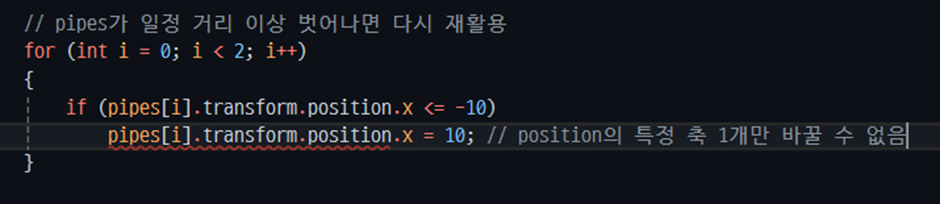
// pipes가 일정 거리 이상 벗어나면 다시 재활용 + pipeType 재설정
if (pipe.transform.position.x <= -10f)
{
RandomPipeType();
pipe.transform.position = new Vector3(10f, pipe.transform.position.y, pipe.transform.position.z);
// position의 특정 축 1개만 바꿀 수 없기 때문에 전체 다 작성하여 보내야 함
}
}
}
private void RandomPipeType()
{
// 처음 시작할 때, Pipe Type 설정
int ranInt = Random.Range(0, 3); // 0, 1, 2 중 랜덤하게 설정
pipeType = (PIPE_TYPE)ranInt; // 형변환하여 pipeType 설정
switch (pipeType) // 수업에선 if, else if로 작성
{
case PIPE_TYPE.TOP:
pipes[0].SetActive(true);
pipes[1].SetActive(false);
break;
case PIPE_TYPE.BOTTOM:
pipes[0].SetActive(false);
pipes[1].SetActive(true);
break;
case PIPE_TYPE.ALL:
pipes[0].SetActive(true);
pipes[1].SetActive(true);
break;
}
}
}
10. pipe의 y position 랜덤 배치
: Pipe Group의 y position은 0이기 때문에 Pipe Group에 대해 Random으로 y position 설정 (지금 프로젝트 기준 최대 : 3.5 / 최소 : -1.5)
>> 딱 정해진 것이 아니라 자유롭게 나오도록 float타입으로 Random 적용
using System.Collections;
using System.Collections.Generic;
using UnityEngine;

public class RandomPipe : MonoBehaviour
{
    public enum PIPE_TYPE { TOP, BOTTOM, ALL } // pipe가 랜덤하게 켜질 때, 경우의 수
    public PIPE_TYPE pipeType;

    public GameObject[] pipes; //GameObject 배열
    public float pipeSpeed = 5f;

    void Start()
    {
        RandomPipeType();
    }

    void Update()
    {
        foreach (GameObject pipe in pipes)
        {
            pipe.transform.position -= pipeSpeed * Time.deltaTime * Vector3.right;

            // pipes가 일정 거리 이상 벗어나면 다시 재활용 + pipeType 재설정
            if (pipe.transform.position.x <= -10f)
            {
                RandomPipeType();
                pipe.transform.position = new Vector3(10f, pipe.transform.position.y, pipe.transform.position.z);
                // position의 특정 축 1개만 바꿀 수 없기 때문에 전체 다 작성하여 보내야 함
            }
        }
    }

    private void RandomPipeType()
    {
        // 처음 시작할 때, Pipe Type 설정
        int ranInt = Random.Range(0, 3); // 0, 1, 2 중 랜덤하게 설정
        pipeType = (PIPE_TYPE)ranInt; // 형변환하여 pipeType 설정

        switch (pipeType) // 수업에선 if, else if로 작성
        {
            case PIPE_TYPE.TOP:
                pipes[0].SetActive(true);
                pipes[1].SetActive(false);
                break;
            case PIPE_TYPE.BOTTOM:
                pipes[0].SetActive(false);
                pipes[1].SetActive(true);
                break;
            case PIPE_TYPE.ALL:
                pipes[0].SetActive(true);
                pipes[1].SetActive(true);
                break;
        }

        // 높이를 랜덤하게 바꾸는 기능
        float ranFloat = Random.Range(-1.5f, 3.5f);
        transform.position = new Vector3(transform.position.x, ranFloat, transform.position.z);
    }
}
Audio
: 소리 출력을 위해 필요한 3가지
1. 스피커
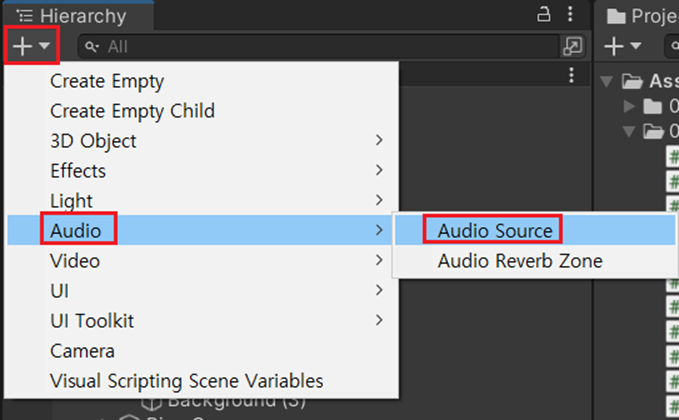
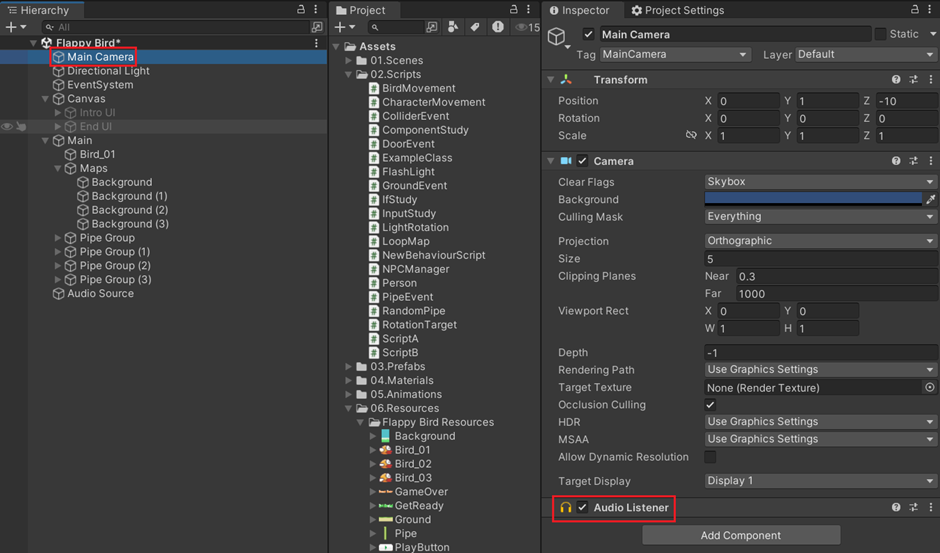
2. 헤드셋 : Camera에는 무조건 Audio Listener가 있음
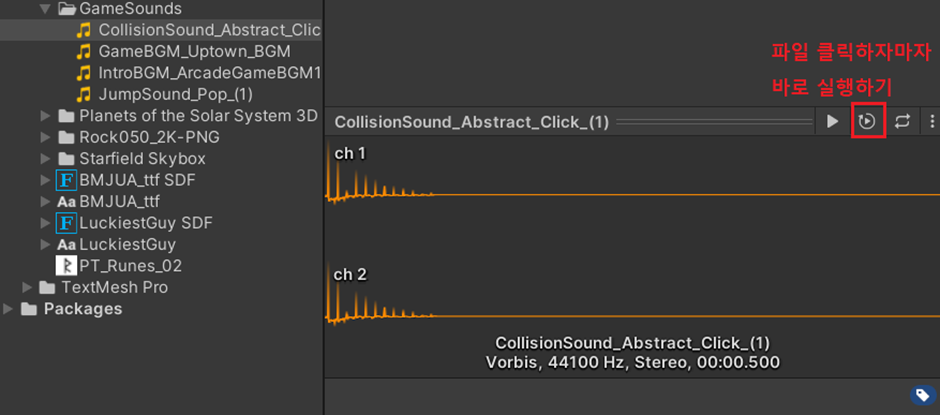
3. 음원 : Audio 파일은 Ogg 타입이 가장 최적화된 파일
※ 파일 클릭하자마자 바로 실행하기
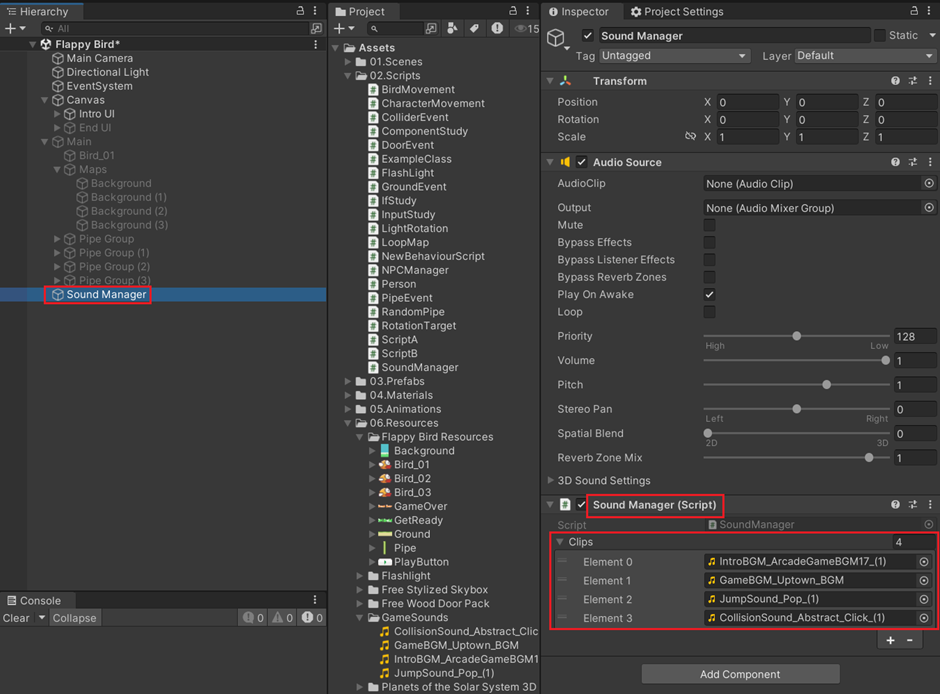
Audio 넣기
1. Script를 활용하여 사운드 재생하기
>> 헤드셋은 Camera가 알아서 할 테니, 스피커와 음원만 다루면 됨
※ 스피커가 하나기 때문에 음원을 바꿔도 겹치는 게 아니라 넘어감
using System.Collections;
using System.Collections.Generic;
using UnityEngine;

public class SoundManager : MonoBehaviour
{
    private AudioSource audioSource; // 스피커
    public AudioClip[] clips; // 음원
    // 0. 인트로, 1. 메인, 2. 점프, 3. 충돌

    void Start()
    {
        audioSource = GetComponent<AudioSource>();

        OnIntroBGM(); // 게임을 시작하면 어차피 Intro기 때문에 바로 시작
    }

    // 외부에서 사운드 함수를 실행해야함
    public void OnIntroBGM() // BGM --> 반복 실행
    {
        audioSource.clip = clips[0];
        audioSource.loop = true; // Inspector 에서도 수정 가능
        audioSource.Play();
        // Play() : 스피커가 소리파일을 잡고 실행
    }

    public void OnMainBGM()
    {
        audioSource.clip = clips[1];
        audioSource.loop = true;
        audioSource.Play();
    }

    public void OnJumpSound() // Sound --> 필요할 때 한번 실행
    {
        audioSource.PlayOneShot(clips[2]);
        // PlayOneShot() : 스피커에서 나오는 소리와 상관없이 잠깐 한번 실행 --> 노래 끊김 X
    }

    public void OnCollisionSound()
    {
        audioSource.PlayOneShot(clips[3]);
    }
}
※ 게임을 시작하면 바로 Intro가 나오기 때문에 Start()에 OnIntroBGM() 추가
2. 추가한 Audio Source에 Script 넣고 순서에 맞춰서 음원 넣기
>> AudioClip[] 배열에 해당
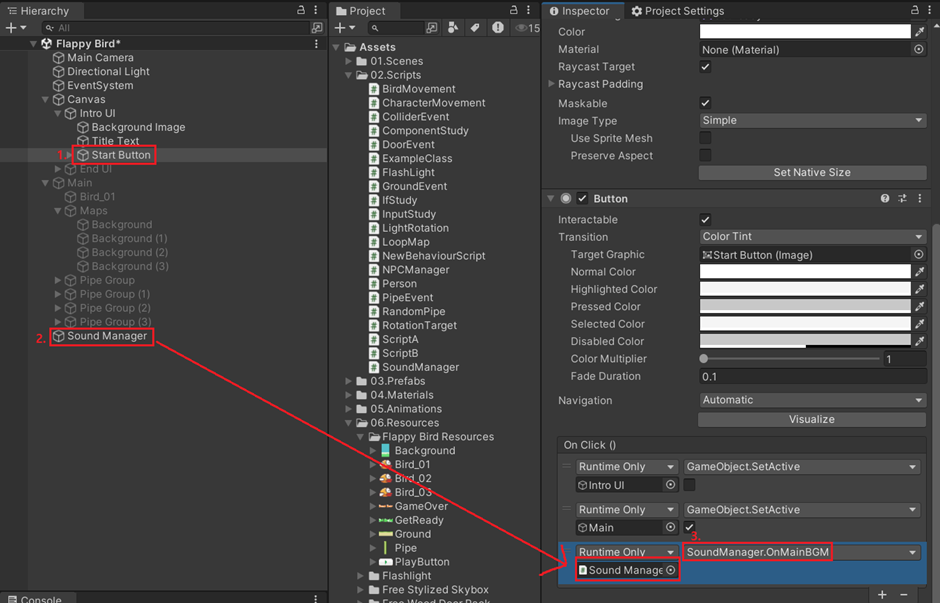
3. Button의 OnClick()에 Sound Manager 넣고 OnMainBGM 설정
>> 버튼을 클릭하면 Main으로 넘어가기 때문에
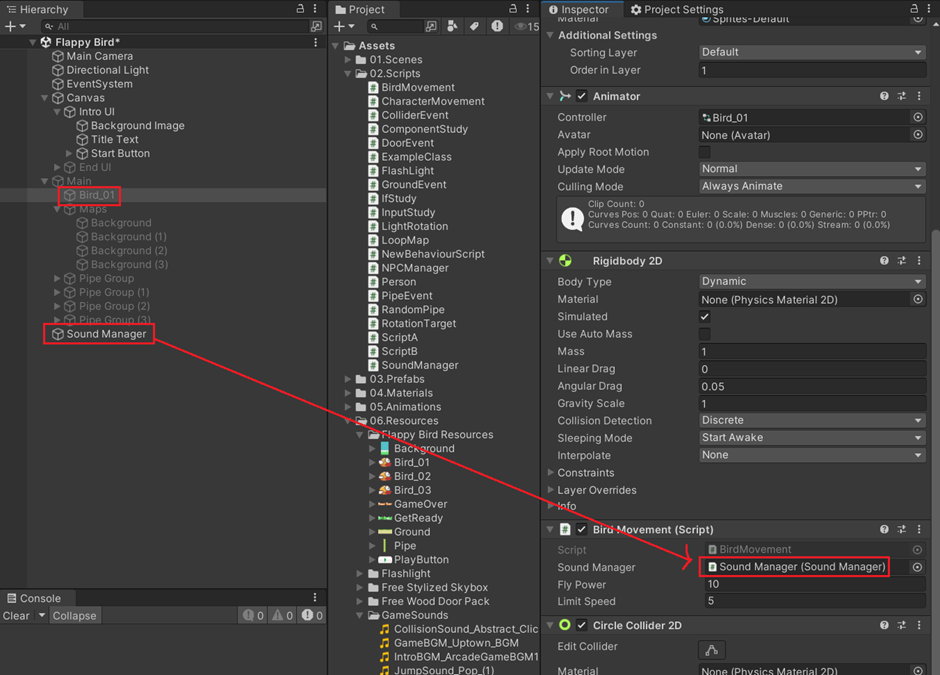
4. Jump Sound 추가
: BirdMovement Script에 Sound 관련 변수 및 함수 추가, Bird의 Inspector에 할당
using System.Collections;
using System.Collections.Generic;
using UnityEngine;

public class BirdMovement : MonoBehaviour
{
    public SoundManager soundManager; // SoundManager 타입의 변수

    private Rigidbody2D myRigid;
    public float flyPower = 10f;

    public float limitSpeed = 5f;

    void Start()
    {
        myRigid = GetComponent<Rigidbody2D>();
    }

    void Update()
    {
        if (Input.GetKeyDown(KeyCode.Space))
        {
            myRigid.AddForce(Vector2.up * flyPower, ForceMode2D.Impulse); // 위쪽으로 힘을 가함

            // 속도 체크
            if (myRigid.velocity.y > limitSpeed) // 새의 y축 속도가 제한 속도보다 큰가?
            {
                // 속도 재조정
                myRigid.velocity = new Vector2(myRigid.velocity.x, limitSpeed);
            }

            // Jump Sound 재생
            soundManager.OnJumpSound();
        }
    }
}
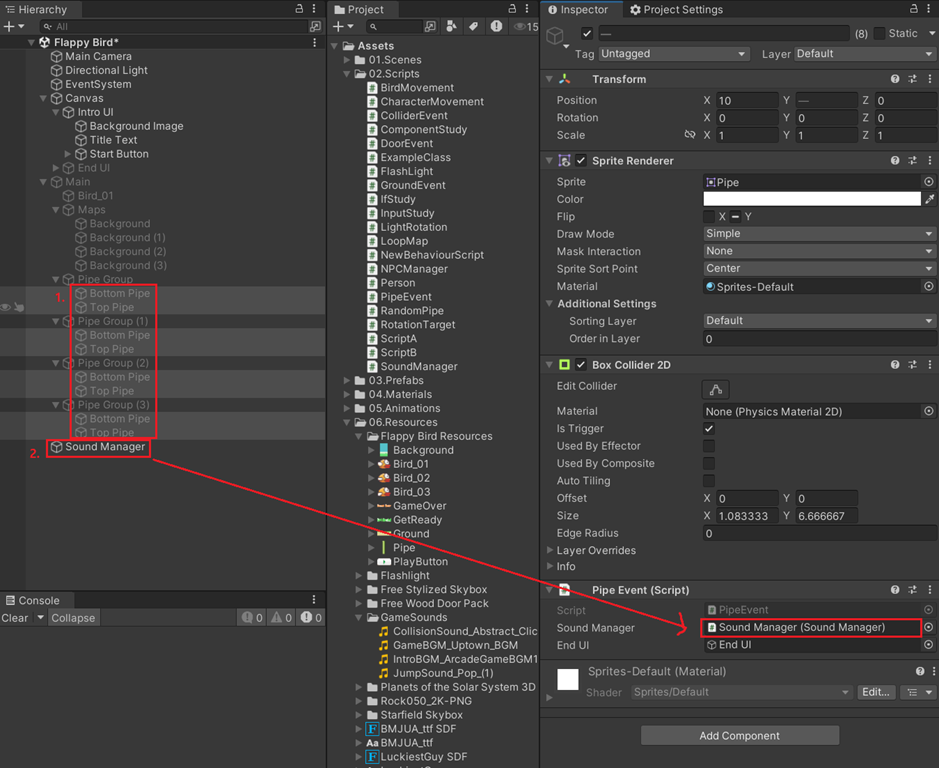
5. GameOver Sound 추가
: PipeEvent Script에 Sound 관련 변수 및 함수 추가, 모든 Pipe의 Inspector에 할당
using System.Collections;
using System.Collections.Generic;
using UnityEngine;

public class PipeEvent : MonoBehaviour
{
    public SoundManager soundManager; // SoundManager 타입의 변수
    public GameObject endUI;

    public void OnTriggerEnter2D(Collider2D collision)
    {
        if (collision.CompareTag("Player"))
        {
            endUI.SetActive(true); // End UI가 켜지는 기능
            Debug.Log("Game Over");

            // Game Over Sound 재생
            soundManager.OnCollisionSound();
        }
    }
}
Trigger --> Collision
: Pipe에 부딪혀도 Bird가 Pipe를 통과하며 끝나는 것을 개선
using System.Collections;
using System.Collections.Generic;
using UnityEngine;

public class PipeEvent : MonoBehaviour
{
    public SoundManager soundManager; // SoundManager 타입의 변수
    public GameObject endUI;

    // Trigger
    //public void OnTriggerEnter2D(Collider2D collision)
    //{
    //    if (collision.CompareTag("Player"))
    //    {
    //        endUI.SetActive(true); // End UI가 켜지는 기능
    //        Debug.Log("Game Over");
    //
    //        // Game Over Sound 재생
    //        soundManager.OnCollisionSound();
    //    }
    //}

    // Collision
    public void OnCollisionEnter2D(Collision2D collision)
    {
        if (collision.gameObject.CompareTag("Player"))
        {
            endUI.SetActive(true); // End UI가 켜지는 기능
            Debug.Log("Game Over");

            // Game Over Sound 재생
            soundManager.OnCollisionSound();
        }
    }
}
완성 영상
추후 추가 개선점
1. Game Over가 돼도 노래가 멈추지 않음
2. Game Over 후, Retry가 없음
: Bird의 velocity를 0으로, 혹시 회전이 있다면 회전속도를 0으로, pipe x position 초기화
>> 처음 Start() 할 때 Reset되는 값들을 저장해두면 편함
3. 몇 개를 통과했는지 또는 얼마나 오래 버텼는지 점수가 없음
>> 타이머
using System.Collections;
using System.Collections.Generic;
using UnityEngine;

public class TimerEvent : MonoBehaviour
{
    private float timer = 0f;
    public float wantTime = 10f; // 원하는 시간

    void Update()
    {
        timer += Time.deltaTime; // 타이머 기능

        if (timer >= wantTime)
        {
            Debug.Log("타이머 알람");
        }
    }
}
4. Game Over 됐을 때, 메인화면 진행이 멈추지 않음
: Pipe가 계속 이동
>> 다른 사람이 공유해준 방법 (대신 Bird는 계속 떨어짐)
5. Bird의 상승/하강에 따른 회전이 없음
Unity에서 제공하는 게임 화면 녹화
https://contents-studio.tistory.com/134
[Unity] Unity 게임 화면 녹화하는 방법: Unity Recorder
팀 프로젝트를 하다보면 내가 어디까지 개발했는지를 팀원들하고 공유해야할 때가 있다. 이전 프로젝트에서는 맥북 화면 녹화를 사용했는데, 이전에는 로우폴리로 작업을 했어서 큰 불편함을
contents-studio.tistory.com
Coroutine
: Update()와 별개로 서브로 반복시킴
>> 실행 방법
1. StartCoroutine(함수()); --> 함수명으로 호출하는 방식
2. StartCoroutine(“함수명”) --> 함수로 호출하는 방식
>> 종료 방법
1. StopCoroutine(함수());
2. StopCoroutine(“함수명”);
※ IEnumerator : Coroutine Type
※ yield return new WaitForSeconds(1f);
: 1초씩 대기함 (1초에 한번만 호출됨)
※ yield break;
: coroutine에서 while문 break
※ yield return null;
: coroutine에서 while문 return, 1프레임 대기 --> while (true) 안에 없으면 프로젝트 터짐
※ 예시
using System.Collections;
using System.Collections.Generic;
using UnityEngine;

public class CoroutineEx : MonoBehaviour
{
    public int endTimer = 10;
    private bool isCancel = false;

    void Start()
    {
        StartCoroutine(BombTimer(endTimer));
    }

    IEnumerator BombTimer(int t)
    {
        int i = t;
        while (i > 0)
        {
            Debug.Log(i + "초 남았습니다.");
            yield return new WaitForSeconds(1f);
            i--;

            if (isCancel)
            {
                Debug.Log("폭탄이 해제됐습니다.");
                yield break;
            }
        }

        Debug.Log("폭탄이 터졌습니다.");
    }

    void Update()
    {
        if (Input.GetKeyDown(KeyCode.Space))
        {
            isCancel = true;
        }
    }
}'Development > C#' 카테고리의 다른 글
| [멋쟁이사자처럼 부트캠프 TIL 회고] Unity 게임 개발 3기 11일차 (1) | 2024.12.03 |
|---|---|
| [멋쟁이사자처럼 부트캠프 TIL 회고] Unity 게임 개발 3기 10일차 (0) | 2024.12.02 |
| [멋쟁이사자처럼 부트캠프 TIL 회고] Unity 게임 개발 3기 8일차 (0) | 2024.11.28 |
| [멋쟁이사자처럼 부트캠프 TIL 회고] Unity 게임 개발 3기 7일차 (1) | 2024.11.27 |
| [멋쟁이사자처럼 부트캠프 TIL 회고] Unity 게임 개발 3기 6일차 (0) | 2024.11.26 |


